Hey, we are back after half a year! At this point, we have finished 3D printing all of the necessary parts. We have also received all the orders from Aliexpress and we started to look for a local swiss shop, where we could order screws, bolts and washers for a reasonable price. Then it was time to assemble the main body of the rover and try to spin a wheel.
Double-checking the inventory
We found most of what we were looking for on the website of Bossard (with a little help from the kind people at Robopoly). But while calculating the number of items and double-checking parameters of the parts, we noticed a problem: the screws that are supposed to connect the aluminum extrusions with the 3D printed parts have a smaller diameter than the ridge of the extrusions — our extrusions from Aliexpress have a profile incompatible with M3 nuts. This means the nuts don’t stay inside and it is impossible to use the original construction proposed by Roger.
Workaround of a different extrusion profile
We tried a few things including a design of new 3D printed inserts/spacers, but after some time spent on these experiments, we ended up removing all of the 3D printed spacers and adding a wide M3 washer on the inside of the extrusion, which prevented the M3 nuts from falling out. This decision comes at a price of not having anything to hold the nuts in place. We doubted this would work, but surprisingly enough, after you tighten the nut to a certain degree, it no longer slips and there is no need to hold it in place when tightening further. This might come back to bite us later on, but for now it is an acceptable solution.
Assembling the main body
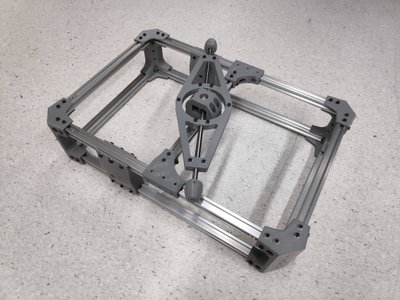
With this problem solved (or at least postponed), we were finally able to assemble the body. Counting how many washers have to be inserted for future connections before assembling everything together was a bit tedious, but we finally arrived at something that started to resemble the future look of our rover. Have a look:

Spinning the wheel
While thinking about the mechanical assembly of the body, we decided to try out some of the electronics. The most important parts of our rover will be the wheels, so we decided to try and give them a spin! We haven’t managed to cut our steel rods to the desired lengths yet, so we constructed a very long wheel axis and decided that testing the wheels on the following construction would be enough.
After the hardware was finished, we connected the motor to the control board and it was time to tell the board what to do with our wheel. It turns out that the software provided with the motors is only Windows compatible and we didn’t have a Windows computer at hand. One Google search was enough to fix the problem and this is where we would like to thank Maxim Kulkin for his program for controlling the LX16a motors, which took about 30 seconds to install and worked like a charm on our macOS computers.
What’s next
The next thing we are missing are the shafts for all of the rotating elements. We have the rods, but we need to find a way to cut them to the required lengths and make the ridges in them for the stoppers which keep them in place. Many of the shafts also need to be flattened in some parts in order for the holding screws to have a reliable grip on them during their rotation.
After that, we should be able to construct the Rocker-Bogie mechanism and start thinking about wiring that needs to lead to all the motors, as well as the rest of the electronics.